Achillies tendinopathy can occur in any athlete’s sport and training that requires a large number of elastic contacts with the ground. Monitoring the load of these contacts can be extremely difficult. An Achilles tendinopathy may occur when the amount of elastic load through training and play has not been met with adequate strength work through the foot and ankle complex, this is when degradation of tissue can occur.
Tendinopathy is the breakdown of collagen protein within a tendon. Tendinopathy is caused by microtrauma to the tendon without adequate rest to heal. If you continue to overload a tendon without the necessary amount of rest, you will continue to break down the collagen protein that makes up the tendon.
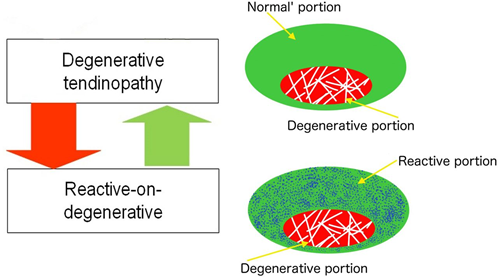
Achilles tendinopathy can be present at the insertion, down towards the heel or higher up towards the bottom of the calf. Tendinopathy pain is localised and consistent (Rio, 2014). The pain is associated with excessive loading of the tendon and is important as pain presents to protect the area (Rio, 2014).
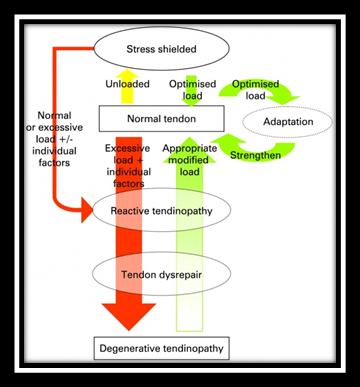
Figure 1. demonstrates the relationship between tendon health and the optimisation of load. If the tendon is exposed to excess amounts of load without adequate progression, this is where you can start to see an inflammatory response and the breakdown of tissue.
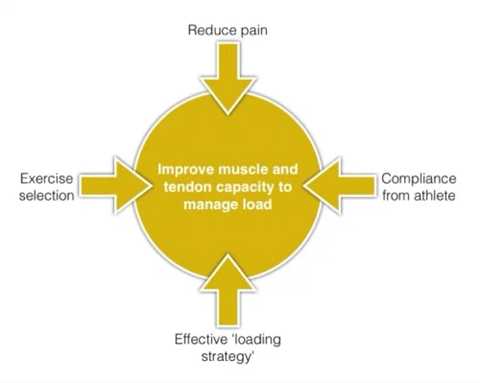
It is important to remember that rest alone is not how you treat tendinopathy. Contrary to popular belief, you need to load degenerative tendons to cause a positive adaptation and rebuild healthy tendon tissue. A carefully structured and monitored strength program is the most efficient way to manage tendinopathy and get you back to playing sport.
A program can be broken up into 3 specific stages. How long each stage will take depends entirely on how the tendinopathy responds to the program. For some, the response may be positive after the first few sessions, for others this may take a couple of weeks. If you are unsure, we recommend following each stage for 2 weeks, performing each session 2-3 times a week.
Stage 1: Initial Assessment, Introduction to Load & Tissue Remodeling
Goal – Decrease pain, assess load capacity of ankle complex and reintroduce load.
Stage 1 programming will start with the basics. It will include slow tempo exercise and isometrics in order to restore functional capacity and reduce pain.
Testing –
- VALD ForceFrame Seated Calf Test
- VALD ForceDecks Bilateral Hop Test
These are baseline measurements we take for the initial assessments at AAC. These 2 tests provide us with an indication of the load tolerance for the calf and Achilles tendon respectively.
If pain is limiting your ability to perform these tests, you should aim to introduce strength exercise and low amplitude plyometrics gradually first. Tolerance and load capacity can be built through submaximal exercise. If you feel as though the initial work is too easy, then you have started at the right place.
24 Hour Rule
If 24 hours after loading the tendon your pain and stiffness levels are worse, the load may have been too great. It is important to record how you are feeling during and after sessions. This feedback gives you important information about the response to load.
Programming Example –
- Toe flexes
- Foot Circles
- Bilateral Calf Raises (from floor)
- Tibialis Raises
Based on how you are able to perform each initial exercise and the recorded response afterwards, you can gain an insight on how the tendon has responded to the introduction of load. This helps you decide how quickly you can progress through each stage of the program.
Progression Example –
- Weighted Bilateral Calf Raises
- Single Leg Calf Raise Isometric
- Eccentric Seated Calf Raises
A rehabilitation program can be easily incorporated at the beginning of sports training or can be included into gym sessions. Where there is adequate time to perform the program without haste and the quality of work is kept high is our recommendation. If gym access is unavailable, inform your coach and get a home program to suit.
2 times a week is the recommended dose of the initial program. As loading progresses and tolerance builds, you can then look at increasing frequency, intensity and/or volume. It is important to record how you have performed the program and how you felt 24 hours afterwards. Questionnaires (such as Pain and RPE) are useful tools for recording how you felt before, during and after each session. This is a great way to track progress throughout your rehab.
Stage 2: Strength Progressions & Introduction to Plyometrics
Goal – Increase intensity and complexity of strength exercises as well as introducing plyometric movements into the program.
Stage 2 will build on the capacity gained in stage 1. Here, you will start to add more load to weighted exercises whilst keeping the tempo slow initially. The introduction of plyometrics can be daunting so it is crucial to take your time and gain confidence during this stage. Initial exercises will consist purely of extensive plyometrics as you are aiming to build capacity without overloading the tendon and causing an inflammatory response.
Programming Example –
- Single Leg Standing Calf Raises
- Heavy Eccentric Calf Raises
- Sled Push
- Lunge Iso Calf Raise
- Pogo Jumps
- Band Assisted Hops
Progression Example –
- Weighted Single Leg Calf Raise Isometric
- Barbell Calf Bounces
- Low Box Circuit – 3 Way Hop, Split Jump, Straddle Jump
- A Skip
- B Skip
- Low Bounds
- Dribbles
Stage 3: Plyometric Progressions, Return to Play Drills & Long-Term Management
Goal – Intensify plyometric variations, integrate various athletic drills and sprints.
By stage 3, we want you feeling confident in the strength and ability of the foot-ankle complex. As the capacity of load and the tolerance to plyometrics and elastic ground contacts progress, you can start to incorporate athletic drills, more intensive jumps and sprints into the program.
Programming Example –
- Weighted Single Leg Tempo Calf Raises
- A Skip Variations
- Bounding Variations
- Depth Jumps
- Hurdle Jumps
- Sprints
- COD Drills
Rehabilitation is training in the presence of an injury. Once you have reached the third stage of the program, training will once again gain a sense of normality. When sport training recommences, the aim will be to maintain the strength qualities gained through rehabilitation and some aspects of the program to be ever-present as you return to sport.